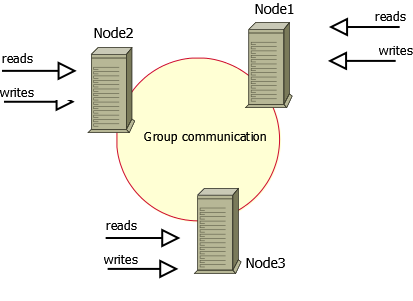
# Percona XtraDB Cluster 是什麼
Percona XtraDB Cluster is a database clustering solution for MySQL
是 MySQL 的叢集與分散式解決方案
 (圖片來源)
# Percona XtraDB Cluster 的功能
Features of Percona XtraDB Cluster
Feature Details Synchronous replication Data is written to all nodes simultaneously, or not written at all in case of a failure even on a single node Multi-source replication Any node can trigger a data update. True parallel replication Multiple threads on replica performing replication on row level Automatic node provisioning You simply add a node and it automatically syncs. Data consistency No more unsynchronized nodes. PXC Strict Mode Avoids the use of tech preview features and unsupported features Configuration script for ProxySQL Percona XtraDB Cluster includes the proxysql-admintool that automatically configures Percona XtraDB Cluster nodes using ProxySQL.Automatic configuration of SSL encryption Percona XtraDB Cluster includes the pxc-encrypt-cluster-trafficvariable that enables automatic configuration of SSL encryptionOptimized Performance Percona XtraDB Cluster performance is optimized to scale with a growing production workload
# Percona XtraDB Cluster 的優缺點
Benefits
- When you execute a query, it is executed locally on the node. All data is available locally, no need for remote access.
- No central management. You can loose any node at any point of time, and the cluster will continue to function without any data loss.
- Good solution for scaling a read workload. You can put read queries to any of the nodes.
Drawbacks
- Overhead of provisioning new node. When you add a new node, it has to copy the full data set from one of existing nodes. If it is 100 GB, it copies 100 GB.
- This can’t be used as an effective write scaling solution. There might be some improvements in write throughput when you run write traffic to 2 nodes versus all traffic to 1 node, but you can’t expect a lot. All writes still have to go on all nodes.
- You have several duplicates of data: for 3 nodes you have 3 duplicates.
# 簡而言之
Percona XtraDB Cluster 就是可以建構多台以上的 MySQL
然後它們之間資料自動同步一模一樣,每一台都可以讀寫
# 測試環境
使用 Percona XtraDB Cluster 版本為 8.0
測試 OS 為 AlmaLinux release 8.8
# 主機與 IP 配置
Percona XtraDB Cluster 建議至少三台
10.10.10.137 pxc-cluster-node-1
10.10.10.138 pxc-cluster-node-2
# 防火牆
每個 node 彼此間要開放 3306, 4444, 4567, 4568 PORT
# 開始安裝 Percona XtraDB Cluster
每台 node 都要安裝
dnf install epel-release -y
dnf install https://repo.percona.com/yum/percona-release-latest.noarch.rpm -y
percona-release setup pxc-80
dnf install percona-xtradb-cluster -y
# 啟動 mysql
systemctl start mysql
# 查看預設密碼
grep 'temporary password' /var/log/mysqld.log
它啟動後會在 log 裡面看到預設密碼,拿它點來登入改更預設密碼
2023-09-17T00:54:42.852177Z 6 [Note] [MY-010454] [Server] A temporary password is generated for root@localhost: tu&UM*Va(2)v
# 變更密碼
mysql -u root -p'tu&UM*Va(2)v'
ALTER USER 'root'@'localhost' IDENTIFIED BY 'password';
FLUSH PRIVILEGES;
正式環境記得使用復雜的密碼
# 要使用 SSL 連線
8.0 版的要求
複製 node 1 的下列三個 key 到其它 node
/var/lib/mysql/ca.pem
/var/lib/mysql/server-cert.pem
/var/lib/mysql/server-key.pem
cd /var/lib/mysql/
scp server-key.pem server-cert.pem ca.pem root@pxc-cluster-node-2:/var/lib/mysql/
# 編輯 mysql 設定 on node 1
vi /etc/my.cnf
wsrep_cluster_address=gcomm://10.10.10.137,10.10.10.138
default_storage_engine=InnoDB # 只支援 InnoDB
wsrep_cluster_name=pxc-cluster

wsrep_node_address=10.10.10.137
wsrep_node_name=pxc-cluster-node-1

wsrep_provider_options="socket.ssl_key=server-key.pem;socket.ssl_cert=server-cert.pem;socket.ssl_ca=ca.pem"

[sst]
encrypt=4
ssl-key=server-key.pem
ssl-ca=ca.pem
ssl-cert=server-cert.pem
# 不用 mysql.service 啟動 on node 1
第一台要改用 [email protected] 啟動
其它 node 加入後,就可以改回 mysql.service 啟動
但要先 stop [email protected]
systemctl stop mysql.service
systemctl start [email protected]
# 查看狀態
mysql -u root -ppassword
SHOW STATUS LIKE 'wsrep%';
wsrep_local_state_comment   Synced
wsrep_incoming_addresses    10.10.10.137:3306
wsrep_cluster_weight        1
wsrep_cluster_size          1
以上表示成功
node 變多,數值會跟著變動
# 設定 on node 2
vi /etc/my.cnf
wsrep_cluster_address=gcomm://10.10.10.137,10.10.10.138
default_storage_engine=InnoDB
wsrep_cluster_name=pxc-cluster

wsrep_node_address=10.10.10.138
wsrep_node_name=pxc-cluster-node-2

wsrep_provider_options="socket.ssl_key=server-key.pem;socket.ssl_cert=server-cert.pem;socket.ssl_ca=ca.pem"

[sst]
encrypt=4
ssl-key=server-key.pem
ssl-ca=ca.pem
ssl-cert=server-cert.pem
# 啟動 mysql on node 2 與狀態
systemctl start mysql
SHOW STATUS LIKE 'wsrep%';
wsrep_local_state_comment   Synced
wsrep_incoming_addresses    10.10.10.138:3306,10.10.10.137:3306
wsrep_cluster_weight        2
wsrep_cluster_size          2
# 測試寫入 on node 1
mysql -u root -ppassword
CREATE DATABASE testdb;
USE testdb;
CREATE TABLE table1 (node_id INT PRIMARY KEY, node_name VARCHAR(30));
INSERT INTO testdb.table1 VALUES (1, 'pxc-cluster-node-1');
INSERT INTO testdb.table1 VALUES (2, 'pxc-cluster-node-2');
SELECT * FROM testdb.table1;
# 測試讀取 on node 2
SELECT * FROM testdb.table1;
每個 node 各自新增刪除修改,其它 node 皆會同步
+---------+--------------------+
| node_id | node_name          |
+---------+--------------------+
|       1 | pxc-cluster-node-1 |
|       2 | pxc-cluster-node-2 |
+---------+--------------------+
# 最後
可以使用 sysbench 對 mysql 進行效能測試
可以使用 proxysql 或 haproxy 建立 load balance 讓讀寫自動分流
留言